Showing posts with label Graphics Toolbox. Show all posts

Tuesday, July 12, 2011

Graphics Toolbox Tuesdays: Project Kits

Are you a novice when it comes to the world of Graphic Design?  With Graphics Toolbox, Great Software Tools brings you a professional quality graphic design program and Projects Kits that help you get started in the world of Graphics Design!

In order, to help teachers and homeschool parents create valuable projects with their students, we are continuing to develop downloadable curriculum project kits that can benefit a variety of subjects and age levels.

The kits include the step-by-step instructions and all the files you need to create these dynamic and educational projects.

These ideas should be the starting point for you. Once you create these projects your own creative juices will begin flowing and you can apply your Graphics-Toolbox skills to enhance your existing curriculum programs. Have fun!

In addition, once you have completed these kits, you will have become very familiar with the tools that Graphics Toolbox offers, and will be able to use these kits as they were intended, as a starting point. Our desire is that these kits will spark ideas for future projects.

Colonial America - $29

This valuable project can be created as shown or it can be divided into more than one project. Within a classroom, students at different learning levels can work on the same project, but do 1, 2 or all 3 components, depending on their capabilities.

They will naturally choose different colors for the map and keys and therefore all their projects will look different and display their individual creativity. All students will feel proud of the final outcome.

Combining Graphics-Toolbox with this great hands-on visual-learning kit will color their interest for Social Studies and ensure they learn more about Colonial America in the process!

Once this project teaches you to work with maps, keys and time lines in Graphics-Toolbox, use your new skills to enhance other Social Studies curriculum material.


Exploring Favorite Artists - $39


The Exploring Famous Artist project kit can be used by teachers of all subjects. The approach here is to give the students the skills they need to report on their research in several valuable media forms.

After using the files and templates we provide to learn the steps for this project, an English teacher could have her students follow the same steps for their research on authors or a character in a novel. For social studies it could be used for explorers or presidents. Music teachers could assign composers or influential musicians and so forth. Download the project and see how Graphics-Toolbox software and this kit can enhance your lesson plans and prepare students to present their knowledge in valued formats.

Included are the files, templates and finished samples of a poster, PowerPoint presentation, tri-fold brochure and trading cards about Claude Monet. Download this kit and have fun learning!


This is My Book! - $29

This is My Book! was developed to encourage creativity and stimulate research on your favorite subject – You! It is a fun, informative project for children, but also a wonderful project for adults. Different ages can approach it with different levels of detail. The project is intended to inspire reflection on your life and you can choose to use all of the pages or only the ones that are meaningful to you. Consider creating one as a gift for someone special! We hope that it will be a starting point and that you will continue the book as far into the future as you would like. Life is a work in progress; we hope this book will be too!
The kit is available as a downloadable zipped file. The kit includes:
1. The complete book in 2 formats:

a. Each of the individual pages in PCX format, which can be opened in Graphics-Toolbox, where photos, graphics, borders and text can be added creatively.b. PDF form for users that want to print out the book then color and glue photos and images by hand.

2. Complete step-by-step instructions showing examples of completed pages.


If you have questions please contact me at jennifer@greatsoftwaretools.com

Please visit our website for more information, and to download your 30 day free trial of Graphics Toolbox! ( this is a full featured edition)


Tuesday, July 5, 2011

Graphics Toolbox Tuesdays: Photo Editing

We have all taken the photos that we wish were just a little better. That happened last week for me.

My kids went to camp, and we took our Annual picture in the front yard. We were running late, so we really did not have time for a 'do over' picture.  The kids looked fabulous, but just as I snapped, I noticed that our neighbors family walked behind the kids, and ultimately ended up in the shot.  Here is the photo below.....


Now the photo isn't horrible, I just wish we did not have background people. However, with Graphics Toolbox, I don't have to just live with that picture.... I can take those people out!

And that is exactly what I did!


With a few simple steps.. I was able to wash those background people right out of the picture!  By using the cloning tool, I was able to extend the bushes that are behind the walking people. As well as the street and curb.

While I was at it, I thought I would touch up the grass. I took a shadow on both the bottom right and left hand corners.  And along the left hand side, I also touched up a dead patch of grass ( near my daughters elbow). So now it looks like a lovely green lawn!

So after just a few moments, I now have the photo I wanted! showcasing, my wonderful children!

Our family has enjoyed using Graphics Toolbox for so many different types of projects. From educational, to crafting, to photo editing.. and much more! Keeping checking in here, for more projects, small and large..

Visit our website to see all the awesome hobby applications that are available!

Here you can see another one of our short videos showcasing some of the features you will have at your fingertips with Graphics Toolbox.

[youtube]http://www.youtube.com/watch?v=B55CPCcumVM&feature=player_embedded#at=20[/youtube]

If you have any questions, please do not hesitate to contact me at jennifer@greatsoftwaretools.com

Monday, June 27, 2011

Graphics Toolbox Tuesdays - Money Math

Hello everyone! Welcome to another edition of Graphics Toolbox Tuesdays. Once again, my goal today, is to show you simple projects that you can create using Graphic Toolbox to educate your children.

This week's project is about money! You can use Graphics Toolbox to teach your child all about money. Many children learn better when they use manipulatives. You can use Graphics Toolbox in that capacity as well.

I created a simple sheet and called it "Know Your Money", using images of US Dollars and Coins.  You can see the sheet here...


Now from here you can take this into a couple of different directions.  In the first example, I simply typed in dollar amounts... shown here...


You can now have your student use the framing tool, and frame out the appropriate currency and place it under the amount listed.


In this following example I used photos of items in our home...


First, I imported them into Graphics Toolbox, then I had some fun and created a cute frame, and then I created a price tag for each item. In just a few steps I was able to create the tag with the string. Now, depending on the age and skill level of your child, you the parent can create the pictures. However, Graphics Toolbox is very user friendly, and after a little bit of practice, your child will be able to create the photos themselves.

Here is what a completed sheet would look like..


This gives them the manipulation skills they need to help make their learning concrete, while also using this simple money lesson to teach them technology skills for their future. As you can see from these illustrations, you can adapt the projects to meet the needs and abilities of  your students.

You can learn more about Graphics Toolbox by visiting this page. And by visiting their website.  You can also watch a video about it here....[youtube]http://www.youtube.com/watch?v=B55CPCcumVM&feature=related[/youtube]


Monday, June 20, 2011

Graphics Toolbox Tuesdays: Special Education

Today, I am hoping that what I share with you, will inspire you far beyond my examples!

When you have special needs children, often times you will have an older child who will need some extra help. However, the products on the market are geared for younger children. Here I would like to show you how you can create the support materials your student needs, while tailoring it to their unique likes and interests... and age!

First we are going to look at  " What's Wrong with this photo!"


Now, there are a couple of ways to do this. What I did was first I used google images, and found two images of sports players in action.

I then located several balls from different sports. I then framed out one of the balls, in this case first, the baseball and then the football, and placed them in the photo, over the original ball.

So you see the soccer player is kicking a baseball, and the baseball player is throwing a football. What you see here, is several balls, where the child can simply frame out the ball and place it in the correct place. However, if your child is capable, you can have them locate a picture on the internet, or from a family picture, that would be the correct ball for the photo, and then have them place it.

By doing this you are giving your child several skills. They are getting the support they need, however, they also are learning a technological skill, that would not be present if you simply used flash cards.

Now, here is one other example..


Now here they are trying to discern the photo that does not belong with the others. Again, I found these images on google images for free. Placed them in a row... Now the child will need to figure out which photo does not belong. In this instance, I gave the direction of going to find an appropriate photo to put in it's place, by using the internet, or family photo. You, however, can also decide to place several photos for them to choose from, right on the page, and have them place on of those correctly.

That is the beauty of Graphics Toolbox, you can tailor it to fit your children's needs and interests. For more educational ideas, please visit Great Software Tools today!

If you have any questions please email me at jennifer@ greatsoftwaretools.com.

Thank you for stopping by! Happy creating!

Monday, June 13, 2011

Graphics Toolbox Tuesdays!

Today we are going to look at some fun things that can be done with Graphics Toolbox. From these projects I hope that you can see, that not only can Graphics Toolbox be used for education, but, also for family creative use!

This first project shows a photo of my daughter performing in a Fine Arts competition.


As you can see, not exactly an exciting or fun photo. What can we do to jazz it up a bit??


Now that is exciting! She is playing the piano in front of a massive crowd! How neat! How did we do this?

We used an irregular frame and pulled both my daughter and the piano out of the photo. We then laid it over a photo of a crowd that we found on google images.  We used the resizing tool to make both photos the correct size.

Once placed we framed out the photo by drawing a solid black frame, and then we chose the stitched line frame and matched the color of my daughters shirt for the stitched line. And Voila! A fun picture!

Here are the birthday cards I made for my kids last year!  They really enjoyed them, and I enjoyed making them!


In addition to these projects, we have created thank you notes... I have made them and the children have made them. I have used Graphics Toolbox to dress up the graphics that I use on my blog... I have created a homeschool schedule for a our homeschool, and mini posters that we post around our home.


Over the next few weeks, we will continue to look at Special Needs Projects, and general homeschool projects and blog projects and much, much more!

For more information on Graphics Toolbox, please visit Great Software Tools today!!!  You can also click here to view a video that will show you even more wonderful projects that can be achieved with Graphics Toolbox!

[youtube]http://www.youtube.com/watch?v=B55CPCcumVM&feature=related[/youtube]

Tuesday, June 22, 2010

Graphics Toolbox Tuesdays - What's Wrong With This Picture

For this weeks installment of Graphics Toolbox Tuesdays, we are looking at something that you the parent can create over and over again, to help your special needs child.

With this project you might choose to print out these projects, however, you can also put them in a photo album on the computer and just flip through them.

Many special needs kids have a problem at look at the big picture. They cannot look at something and find items that do not belong, for example.

So I made up two samples of  'What's Wrong With This Picture' cards, that can be used with your special needs kids. These cards I made a bit obvious, however, depending on the needs of the child, and the age of the child, this might be where you start. As time goes on, you can make more subtle changes in the pictures. The possibilities are endless.

So look below and see if you can see what's wrong with these pictures.....


In the above picture, it is plain to see that we have added a crown on this soccer players head.. clearly not the appropriate head gear for a soccer match! As well as changing the soccer ball to a football.. one of my teenagers thought that was quite clever, considering we are the only country that refers to it as soccer and not 'football'.  With both of these changes, I used an irregular frame to pull out the image from it's original background and then added it into this photo. You can use this feature for many different reasons, not just the 'What's Wrong With This Picture' card.

And..........


In this photo I placed an apple in the pitcher's hand,  using the same technique as described above.  We also changed his show to a purple color. We used the color change option for that. We framed out the shoe, by tracing around the outline of the shoe, and then we were able to change only the color of the shoe.

As you can see Graphics Toolbox is a versatile tool that can help enhance your child's educational experience, no matter their age or learning abilities.

If you would like more information on Graphics Toolbox, please visit our website at

www.greatsoftwaretools.com

or email me at jennifer@greatsoftwaretools.com

Graphics Toolbox equips homeschoolers with cutting edge tools to enhance their education today, and give them the skills they need to be competitive tomorrow.

Monday, June 14, 2010

Graphics Toolbox Tuesday- Thank You Notes!!!

Last year while serving on the TOS Homeschool Crew, we reviewed a product called Graphics Toolbox by Great Software Tools.

It is a product that I really enjoyed! About a month ago, I joined the Great Software Tools team, as Homeschool Sales Specialist.

In that capacity, what I am going to be doing, is posting on my blog each Tuesday - Graphics Toolbox Tuesday - a project that my family and I have completed.

My desire is to show you, all the wonderful things you are able to achieve with Graphics Toolbox and how those projects can impact your family and your homeschool.

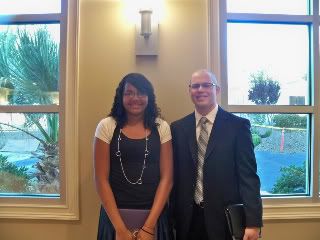
What we created this week is a Thank You note. We created a personalized Thank You note to send to our Pastor's son who spoke at my daughters graduation.

Here is the original photo.


So, what I did first was create a frame, and crop the picture. Once the picture was placed I wanted to color in the border. I decided I wanted to have two colors. I actually was able to pick out colors from within the photograph to create the border. Both color's come from Larry Chappell's tie.


In the next step, I was able to layer in fancy lines. These fancy lines are cataloged in Graphics Toolbox. You can choose the color, and like in this example, I layered in 2 different lines to achieve my desired affect. Once I was happy with the fancy lines, it was time to add in the text. What you see below is the finished graphic.


Now, it is time for printing. With Graphics Toolbox you have the ability to print the image in a manner that you will not have all that extra paper folded into the card. Like with many of the other card maker programs.

When printed, it comes out looking like this..


Now, if you were printing several cards, you could also choose to print two, one on top of the other, and then simply cut between the two.
Since I only needed one, I printed only one, and then cut away the excess paper.

And then you simply fold, and fill in the inside of the card....


This entire project took me about 20- 25 minutes. Now, it only took me that long, because there are still features that I am learning. I imagine that my next thank you card will only take me about 10 minutes or less to make.

Tune in next week to see what else you can make with Graphics Toolbox!

For more information about Graphics Toolbox, you can email me at jennifer@greatsoftwaretools.com


Just added.........
We just whipped up this up for a friend of my daughter....
This is the computer image....


And here is the finished product....


This one did not take nearly as long... and I created an irregular frame, and pulled the music notes out of another picture.

Sunday, March 7, 2010

TOS Crew: Great Software Tool Graphics Toolbox

When I heard that we, as members of the TOS Homeschool Crew would be reviewing Great Software Tools Graphics Toolbox, I was both thrilled and apprehensive.

In addition to a homeschool mother, and amateur blogger, I also write the monthly newsletter for our local homeschool group. I was hoping that this program, might help me with the newsletter. Help to give it a new look. And in time, I am sure it will.

What is Graphics Toolbox? It is a graphics design program, made especially for the home user. However, it has many features that are typical for professional software, at a cost that is geared for the average user. So, how does this tie into homeschooling?

It is simple really. As many of you know, our family uses hands on activities as much as we can, to facilitate comprehension. You can use Graphics Toolbox for the same reason. While you are at it, you can create unique projects that your kids will both enjoy creating and will be proud to showcase!

As I mentioned earlier, I am a novice at Graphic Design. So learning how to work the program, has not been as easy as I hoped for, however, it has been easier than I expected.. if that makes sense.

I had grand ideas of being able to do wonderful projects quickly, while I have learned how to do several things, they are still in the beginning stages. I intended to place my first projects below. However, I have been having trouble uploading them. I will get those up as soon as possible!!

***Please visit here to see the project completed during my trial review period.***

At this point, I have learned to extract an image from a photo. And insert it into a new photo. I had pictures of my kids playing piano in a competition, I took them with the piano out of the original photo, and put them in a photo playing in front of a large crowd. Which was really fun! They loved seeing the finished product!

My goal is to continue working with the program and share with you as I progress. Also, hoping to make some changes to my blog, once I figure out how to insert a new blog header, that is!

I must say, that I have really enjoyed getting to know this program, and look forward to my continued use and understanding of it. I will tell you, that I tried a different graphic design program several years ago, and it was much too complicated.  Graphics Toolbox was easier to understand. Primarily due to the tutorials on their website that give you step by step directions on how to use the program.  You can see some of those tutorials, by visiting here.  With out those, I would not have been able to figure out what the buttons were used for, or I should say, how to use them.

Another plus is the fact that Graphics Toolbox is available for $149. That is an amazing price. The last program I looked at was upwards of $600. The $149 price point, makes it possible for the home user to have the same professional quality at a home user price!

Please visit the crew blog to see what my crew mates think of this product!

I received a free copy of Graphics Toolbox in exchange for my honest opinion. All claims expressed here are mine alone.

**New Disclaimer** As of May 2010, I am now working with Graphics Toolbox as a Homeschool Sale Specialist. The above review was written prior to any working relationship was created.

If you would like more information on purchasing Graphics Toolbox or how to incorporate it into your homeschool, please contact me at jennifer@greatsoftwaretools.com